
Ever found yourself in a bind with a fishing rod missing its eye? Fret not, as we’ve all been there at some point. Picture this: you’re all set for a day of fishing, only to realize your trusty rod needs a quick fix. That’s where knowing how to repair the eye on your fishing rod comes in handy.
In this article, you’ll discover simple yet effective techniques to get your fishing rod back in action in no time. No need for complicated tools or expert skills – just straightforward methods that anyone can follow. By learning these repair tips, you’ll save both time and money, ensuring you’re always ready to tackle the next big catch.
Key Takeaways
- Fishing rod eyes, also known as guides, are crucial for maintaining line tension and facilitating smooth casting.
- Eyes are made of durable materials like stainless steel, ceramic, or titanium and come in various sizes and types based on fishing conditions.
- To assess damage, check for cracks, deformities, and thread issues on the eye, as well as inspect the guide frame and insert for potential problems.
- Repairing a fishing rod eye requires tools like small pliers, rod wrapping thread, rod epoxy, and replacement eyes, along with cleaning materials and latex gloves.
- The step-by-step guide for repairing the eye includes assessing damage, gathering tools, preparing the area, removing the damaged eye, attaching the new one, wrapping it securely, and performing final checks.
- Testing the repaired eye involves visual inspection, tactile examination, functional testing (like string test and load testing), and field trials to ensure optimal performance.

1. INTEGRATED GUIDES RING DESIGN: Stainless Integrated Guides,with strong corrosion resistance,tensilestrength,and fatigue strength.The Smooth Surface of Rings will greatly reduce the chance of damage to fishing line.

8 pcs double leg fishing rod guide in different sizes. Material: Stainless Steel ceramic;
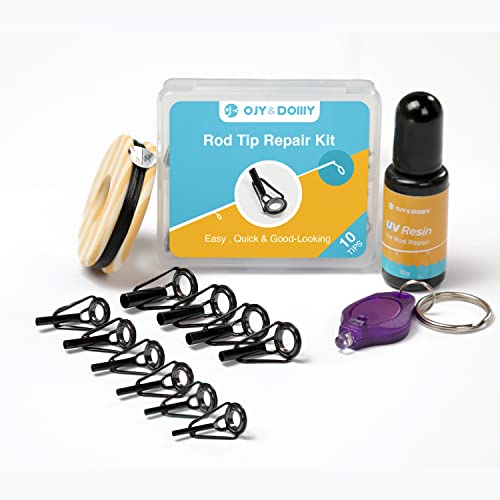
Fishing pole tip repair kit with fast curing rod tip glue to help you repair the broken rod tip within 10 minutes.
Understanding the Eye on a Fishing Rod
When repairing a fishing rod, it’s essential to understand the role of the eye. The eye, also known as the guide, is the small metal loop through which the fishing line passes. It plays a crucial part in maintaining the line’s tension, preventing tangles, and ensuring smooth casting.
To fix a broken eye efficiently, you need to grasp how it functions within the rod’s setup. Imagine it like a tiny gatekeeper, directing your line during casting and retrieval. By comprehending its significance, you can repair it effectively and get back to angling without interruptions.
Here are some key points to consider regarding the eye on a fishing rod:
- Material: Fishing rod eyes are typically made of durable materials like stainless steel, ceramic, or titanium to withstand the rigors of angling.
- Placement: The positioning of the eye along the rod is crucial for line management. Each eye is strategically placed to guide the line smoothly and reduce friction during casting and reeling.
- Size and Type: Eyes come in various sizes and types based on the rod’s intended use. Whether you’re targeting large fish in saltwater or small trout in freshwater, choosing the right eye is essential for optimal performance.
Understanding these basics about the eye on a fishing rod can help you approach repairs with confidence. It’s a fundamental aspect of rod maintenance that every angler should be familiar with to ensure a seamless fishing experience.

Complete fishing rod eyelet inserts repair kit with glue.

[ FishTrip Rod Repair Kit ] 12 sizes of smooth ceramic rings to repair your rod without removing the rod guides. High-quality and smooth rod ceramic eyelets repair kit reduces wear and tear on your fishing line and improve the accuracy of your fishing throw.

FISHTRIP Rod Guides Tip Repair Kit: The fishing rod guides and tips are made of stainless steel frame with ceramic ring, 7 sizes rod guides meet the various types of fishing rods owned by professional anglers.Both freshwater and saltwater/sea fishing are available
Assessing Damage to the Fishing Rod Eye
When checking for damage on your fishing rod eye, start by examining the eye itself. Look for any cracks, chips, or deformities that could affect its functionality. A damaged eye can hinder your casting performance and potentially lead to line breakage.
Next, inspect the wrapping thread around the eye. Ensure it is intact and tightly wound. Loose or frayed thread could indicate wear and tear or impact damage, compromising the stability of the eye.
Check the guide frame for any bends or misalignments. A bent frame can disrupt the line’s trajectory, causing issues during casting and retrieval. Misaligned guides can also result in increased friction on the line, affecting your overall fishing experience.
Additionally, examine the insert of the fishing rod eye. The insert should be smooth and free of any cracks or rough edges. Damaged or rough inserts can damage your fishing line and reduce casting distance.
To assess the overall impact of the damage, test the rod by running a fishing line through the eye. Pay attention to any snags, unusual resistance, or friction points along the way. These issues could indicate problems with the eye that need to be addressed.
By carefully evaluating the condition of the fishing rod eye, you can identify any potential issues and take appropriate steps to repair or replace the damaged components. This proactive approach ensures that your fishing gear remains in optimal condition, allowing you to enjoy a smooth and hassle-free fishing experience.
Tools and Materials Required for Repair
To repair the eye on your fishing rod efficiently, you’ll need a few essential tools and materials. Ensuring you have the right items ready will make the repair process smoother and more effective. Here’s what you’ll need:
Tools:
- Small Pliers: These are handy for removing the damaged eye from the rod.
- Rod Wrapping Thread: Used to secure the new eye in place.
- Rod Epoxy: Helps to fix the eye securely onto the rod.
- Heat Source (Optional): To cure the epoxy if required.
- Replacement Eye: Make sure it matches the size and type of the original eye.
- Rubbing Alcohol: Used for cleaning and preparing the rod surface.
- Paper Towels: For wiping and drying the rod.
- Latex Gloves: Protect your hands during the repair process.
Having these tools and materials at your disposal will help you tackle the task of repairing the eye on your fishing rod with ease. Make sure to work in a well-lit and clean area to prevent any mishaps during the repair process.
Step-by-Step Guide to Repairing the Fishing Rod Eye
To effectively repair the eye on your fishing rod, follow these step-by-step instructions:
- Assess the Damage:
- Check the eye for any cracks, deformities, or thread issues.
- Inspect the guide frame and insert for potential problems.
- Gather the Tools and Materials:
- Ensure you have small pliers, rod wrapping thread, rod epoxy, a heat source (optional), replacement eye, rubbing alcohol, paper towels, and latex gloves.
- Prepare the Area:
- Find a clean, well-lit workspace with ample room to maneuver.
- Remove the Damaged Eye:
- Use the small pliers to carefully detach the old eye from the rod.
- Clean the Area:
- Wipe the rod where the eye was located with rubbing alcohol and a paper towel to remove any residue.
- Select the Replacement Eye:
- Choose a new eye that matches the size and type of the original eye for optimal performance.
- Attach the New Eye:
- Apply rod epoxy to the base of the replacement eye.
- Carefully secure the new eye in place on the rod.
- Wrap the Eye:
- Use rod wrapping thread to neatly wrap around the base of the eye for added support.
- Let It Cure:
- Allow the rod epoxy to dry and cure as per the manufacturer’s instructions.
- Final Checks:
- Ensure the new eye is securely in place and aligned correctly for smooth line flow.
By following these steps, you’ll be able to repair the eye on your fishing rod efficiently, ensuring optimal performance for your fishing adventures.

【3-in-1 Fishing Rod Repair Kit】- Ailiaili fishing rod repair kit is designed to repair your fishing rod, rod tips and pole guide eyelets. It will meet the needs of most cases of fishing rod damage caused by accidents and bring your broken fishing rod back to life, saving you the expensive costs of replacing fishing rod.

【Fishing Rod Tip Repair Kit】- Ailiaili fishing rod tip repair kit Includes 10 sizes replacement rod eyelets, 10g UV glue, UV flashlight, hot melt glue stick, wrapping thread, sandpapers, storage box, charging cable and user manual. I trust it will be the must-have kit in your tackle box and good as the helper of your fishing gear! Perfect Father’s Day Gift for Men.

This kit can repair eyes (guides and tips) of spinning fishing rods;
Testing the Repaired Eye on the Fishing Rod
Now that you have successfully repaired the eye on your fishing rod, it’s time to ensure that the fix is secure and reliable before heading out for your next fishing trip. Testing the repaired eye is crucial to guarantee its functionality and durability. Here’s how you can effectively test the repaired eye on your fishing rod:
- Visual Inspection:
- Check Alignment: Ensure that the replacement eye is aligned correctly with the rod.
- Inspect Bond: Examine the bond between the eye and the rod for any visible gaps or inconsistencies.
- Look for Deformities: Scan the eye for any deformities or irregularities that may affect its performance.
- Tactile Examination:
- Ensure Stability: Gently press and twist the repaired eye to confirm that it is securely attached without any wobbling.
- Check Smoothness: Run your fingers along the eye to verify a smooth surface without rough edges that could damage the fishing line.
- Functional Testing:
- String Test: Pass a piece of string through the eye and simulate casting motions to check for smooth line movement without snags.
- Load Testing: Apply light pressure on the eye to assess its ability to withstand the tension typically experienced during fishing.
- Field Trial:
- Practice Casts: Conduct a few test casts in a safe environment to evaluate the rod’s performance with the repaired eye.
- Observe under Stress: Put the repaired eye through real fishing conditions to observe its durability and functionality in actual use.
Conclusion
Repairing the eye on your fishing rod is a straightforward process that can significantly enhance your fishing experience. By following the steps outlined in this article, you can quickly assess and fix any damage to the eye, ensuring that your rod performs optimally on your next fishing trip. Remember to test the repaired eye thoroughly to guarantee its alignment, stability, and functionality. With a little effort and attention to detail, you’ll have your fishing rod back in top condition in no time. Happy fishing!
Frequently Asked Questions
How common is the issue of a fishing rod missing its eye?
Missing fishing rod eyes are a common issue, often caused by wear and tear, accidents, or improper handling.
What are the key steps to repairing a fishing rod eye?
The key steps include assessing the damage, preparing the workspace, removing the damaged eye, and attaching a replacement eye securely.
How can you test the repaired fishing rod eye?
To test the repaired eye, visually inspect for alignment, check for deformities, assess stability and smoothness through touch, conduct functional tests using strings and load tests, and perform field trials under real fishing conditions.