
Ever found yourself at the water’s edge, eager to cast your line, only to realize your fishing rod’s line is in dire need of replacement? You’re not alone. Whether you’re a seasoned angler or a novice fisherman, knowing how to reline your fishing rod is a valuable skill that can save the day when the big catch is on the line.
Imagine effortlessly casting your line into the shimmering waters, confident in the strength and reliability of your freshly re-lined fishing rod. In this article, you’ll discover simple yet effective techniques to reline your rod like a pro, ensuring smooth casts and successful fishing trips every time. Say goodbye to tangled lines and missed opportunities – with the right know-how, you’ll be ready to tackle any fishing adventure that comes your way.
Key Takeaways
- Inspect your fishing rod for damages before relining to ensure optimal performance and durability.
- Choose the right fishing line based on fishing conditions, species targeted, and line strength needed.
- Properly prepare your fishing rod by securing it and threading the new line smoothly to avoid tangles.
- Use reliable knots to attach the new fishing line securely to the reel and test its strength before fishing.
- Consider the fishing environment, line strength, material, and diameter when selecting the appropriate fishing line.
- Gather essential tools like fishing line, scissors, rod, reel, knot tying tool, and spool holder for a smooth relining process.

【3-in-1 Fishing Rod Repair Kit】- Ailiaili fishing rod repair kit is designed to repair your fishing rod, rod tips and pole guide eyelets. It will meet the needs of most cases of fishing rod damage caused by accidents and bring your broken fishing rod back to life, saving you the expensive costs of replacing fishing rod.

[Rod Tip Repair Kit Size] // Fishing Tip Repair Kit has a huge selection of Rod Tips to fit a variety of rod sizes. Hole Inner Diameter*Quantity: 1.6mm .06 Inch*5, 1.8mm .07 Inch*5, 2.0mm .078 Inch*5, 2.2mm .09 Inch*5, 2.4mm .094 Inch*5, 2.6mm .1 Inch*5, 2.8mm .11 Inch*5, 3.0mm .118 Inch*5, 3.5mm .13 Inch*5, 3.8mm .14 Inch*5; Meet your various needs.
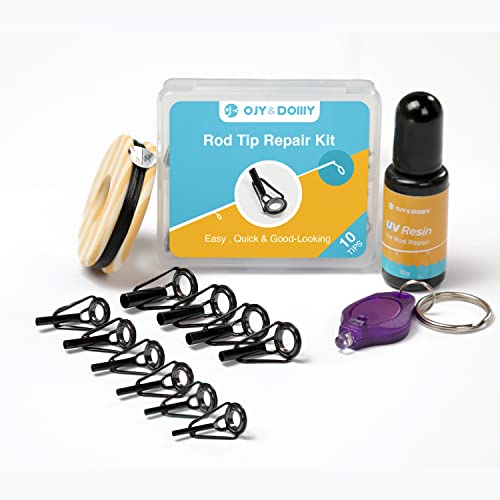
Fishing pole tip repair kit with fast curing rod tip glue to help you repair the broken rod tip within 10 minutes.
Overview of Fishing Rod Relining Process
To successfully reline your fishing rod, follow these essential steps that will help you maintain your equipment and improve your fishing experience.

[Compatibility Specifications] Only for Shimano 1000-4000 size spinning reels (Not For SW models)

Quality Construction: This size 100 spinning fishing reel features a quality graphite body and spool for durability and strength, making it an excellent choice for any crappie fishing adventure

Made using the highest quality materials
Inspecting Your Fishing Rod
Check your fishing rod for any damages, such as cracks or worn-out parts.
Ensure that the fishing line is completely removed before starting the relining process.
Selecting the Right Fishing Line
Choose a fishing line based on the type of fishing you plan to do and the species you are targeting.
Consider the fishing conditions, such as water clarity and the presence of obstacles, when selecting the line weight and material.
Preparing the Fishing Rod
Secure the rod in a stable position to make the relining process easier.
Thread the new fishing line through the rod’s guides smoothly to prevent tangles.
Attaching the Fishing Line
Use a reliable knot to attach the new fishing line to the rod’s reel securely.
Ensure the knot is tight and test it to confirm that it can withstand the pressure of casting and reeling in fish.
Spooling the Fishing Line
Spool the fishing line onto the reel evenly and under proper tension.
Avoid overfilling the reel to prevent line twists and tangles during use.
Testing the Rod
After spooling the new fishing line, test the rod by casting it a few times.
Check for any line twists or tangles that need to be corrected before heading out for a fishing trip.
By following these steps, you’ll be able to reline your fishing rod effectively and ensure that your equipment is ready for your next fishing adventure.
Choosing the Right Fishing Line
To effectively reline your fishing rod, choosing the right fishing line is crucial to enhance your overall fishing experience. Fishing lines come in various materials, types, and strengths, each serving different purposes based on your fishing needs. Here’s how to select the most suitable fishing line for your angling adventures:
Consider the Fishing Environment
When choosing a fishing line, consider the type of environment you’ll be fishing in. Different conditions require specific types of lines. For example:
- In clear water, where visibility is high, opt for a clear monofilament line to make it less visible to fish.
- If you’re fishing in dense cover or rocky areas, a braided line offers better strength and abrasion resistance.
- Saltwater fishing may require a different line than freshwater fishing due to the corrosive properties of salt.
Determine the Line Strength
The strength of the fishing line is crucial to handle various fish sizes and weights. It’s typically measured in pounds (lbs). Consider the following when determining the line strength:
- For smaller fish species like panfish, a line with 2-6 lbs strength is sufficient.
- Medium-sized fish like bass or trout may require a line strength of 6-12 lbs.
- Large game fish such as tuna or marlin would need a much higher line strength of 20 lbs or more.
Select the Right Material
Fishing lines are commonly made from monofilament, fluorocarbon, or braided materials. Each has its advantages:
- Monofilament lines are cost-effective, stretchable, and suitable for beginners.
- Fluorocarbon lines are virtually invisible underwater, making them ideal for clear waters.
- Braided lines offer superior strength and sensitivity but may be more visible to fish in clear conditions.
Match the Line Diameter
The diameter of the fishing line affects its buoyancy, visibility, and casting distance. Consider the following guidelines:
- Thicker lines have higher strength but are more visible and may reduce casting distance.
- Thinner lines are less visible in the water and offer better casting distance.
By carefully considering the fishing environment, line strength, material, and diameter, you can select the right fishing line that best suits your angling needs and enhances your fishing success.
Tools and Equipment Needed for Relining
To properly reline your fishing rod, you’ll need to gather specific tools and equipment essential for the task. Here’s a handy list to help you get prepared:
- Fishing Line: Depending on your fishing needs and the type of fish you are targeting, choose the appropriate fishing line, whether monofilament, fluorocarbon, or braided line. Ensure you have enough line to cover the entire length of your rod.
- Scissors or Clippers: You’ll need sharp scissors or line clippers to cut the fishing line cleanly. Precision in cutting is crucial to prevent fraying and ensure smooth casting.
- Rod and Reel: Have your fishing rod and reel ready for the relining process. Make sure they are clean and free of any existing line before you begin.
- Rod Butt Cap: If your rod requires it, have the appropriate rod butt cap to secure the fishing line at the base of the rod.
- Rod Tip Cap or Guide: Prepare the rod tip cap or guide to thread the new line through the rod smoothly. This ensures that the line feeds correctly during casting.
- Cloth or Tissue: Keep a soft cloth or tissue handy to wipe down the rod and remove any dirt or residue that may affect the casting performance or line durability.
- Knot Tying Tool: A knot tying tool can be beneficial for creating secure knots when attaching the new line to the rod tip or reel spool.
- Spool Holder: To maintain tension and prevent line twists during the spooling process, consider using a spool holder to keep the fishing line steady and controlled.
Having these tools and equipment at your disposal will make the process of relining your fishing rod smoother and ensure that you can enjoy a hassle-free fishing experience with a properly maintained rod.
Step-by-Step Guide to Relining a Fishing Rod
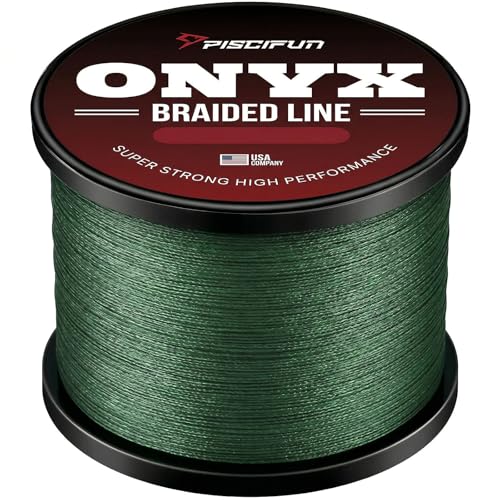
Superior Abrasion Resistance - The Onyx Braided Fishing Line is incredibly tough and features superior abrasion resistance, thanks to its new epoxy coatings technology. This innovative coating helps protect the braided lines from damage, ensuring they hold up well against rough underwater terrain and obstacles

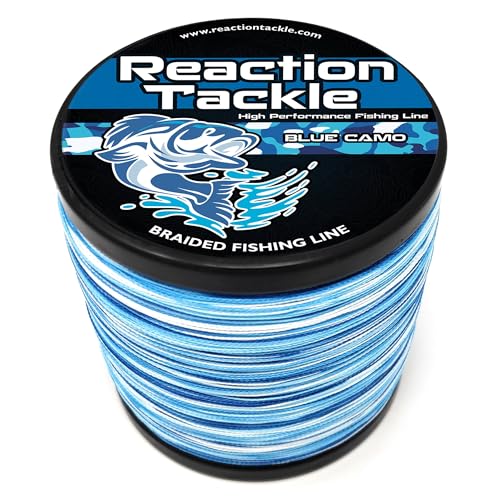
STRONG: This premium braided fishing line from Reaction Tackle is engineered from ultra high molecular weight polyethylene, one of the strongest woven fibers on earth; This braided line is designed to be super tough and withstand the most demanding conditions; When you need braid fishing line that’s as tough as you are, trust only Reaction Tackle
STRONG: This premium braided fishing line from Reaction Tackle is engineered from ultra high molecular weight polyethylene, one of the strongest woven fibers on earth; This braided line is designed to be super tough and withstand the most demanding conditions; When you need braid fishing line that’s as tough as you are, trust only Reaction Tackle
Inspecting the Rod
Begin by inspecting your fishing rod for any damages or wear. Check the guides, tip, and rod blank for nicks, cracks, or rough spots. These imperfections can damage your new fishing line and affect casting performance. Smooth out any rough areas with fine sandpaper and wipe the rod clean.
Selecting the Fishing Line
Choose the appropriate fishing line based on your needs and fishing conditions. Consider monofilament for its stretch and versatility, fluorocarbon for its invisibility underwater, or braided line for its strength and sensitivity. Select a line weight suitable for your target species and fishing technique.
Preparing the Rod
Prepare your rod for relining by removing the old line, cleaning the guides and reel seat, and lubricating the reel. Use scissors or clippers to cut the old line close to the rod tip. Clean the guides with a cloth to remove dirt or residue that could damage the new line. Apply a small amount of reel lubricant to ensure smooth operation.
Spooling the Line
Attach the new fishing line to the reel spool using your preferred knot. Use a knot-tying tool for precision and strength. Apply tension to the line as you spool it onto the reel to prevent tangles and ensure even line distribution. Consider using a spool holder to keep the line organized and prevent twists.
Thread the Rod Guides
Thread the new fishing line through the rod guides starting from the tip and working towards the reel. Ensure the line passes smoothly through each guide without any loops or tangles. Pay attention to the guide size to avoid line friction and potential breakage.
Tying the Knots
Secure the fishing line to the reel spool with a strong and reliable knot, such as an Arbor knot or Improved Clinch knot. Double-check the knot’s tightness to prevent slippage during casting. Use a rod tip cap or guide to protect the line and prevent damage.
Final Checks
After spooling the line and threading the guides, make final adjustments to ensure everything is properly in place. Test the reel’s drag system, guide the line unimpeded while flexing the rod, and inspect the entire setup for any misalignments or issues. It’s essential to have a perfectly lined rod for successful and enjoyable fishing trips.
Tips and Techniques for Optimal Results
Ensuring you have the right tools and follow proper techniques when relining your fishing rod is essential for a successful fishing experience. Here are some tips to help you achieve optimal results:
1. Line Selection:
When choosing a fishing line, consider the type of fishing you’ll be doing. For example, use monofilament line for general fishing and fluorocarbon line for its invisible properties in clear waters.
2. Proper Preparation:
Before starting the relining process, make sure your rod is clean and free of any damages. Inspect the guides and reel seat for wear and tear, and clean them if necessary.
3. Spooling the Line:
When spooling the new line onto the reel, ensure it lays evenly to prevent line twists. Spool the line under slight tension to avoid loose coils that can lead to tangles while casting.
4. Threading the Guides:
Carefully thread the new line through each rod guide, starting from the tip and working towards the reel. Check for any knots or twists as you thread the line to ensure smooth casting.
5. Knot Tying:
Use strong and reliable knots to secure the line to the reel and leader. Popular knots include the improved clinch knot or the Palomar knot for a secure connection that withstands the tension of casting and reeling.
6. Final Checks:
After reeling in the new line, conduct a final inspection to ensure everything is in place. Test the rod’s action by flexing it gently to see if the line moves smoothly through the guides without any obstructions.
Conclusion
You now have a solid understanding of the crucial steps involved in relining your fishing rod for better fishing results. By following the guide’s tips and techniques, such as selecting the right fishing line for your needs, preparing your rod meticulously, and ensuring smooth spooling and knot tying, you’re on your way to an improved fishing experience. Remember, using the correct tools and techniques is key to achieving successful outcomes when relining your fishing rod. So, go ahead, put these insights into practice, and enjoy a more efficient and enjoyable fishing trip next time you hit the water. Happy fishing!
Frequently Asked Questions
Q: Why is it important to properly reline a fishing rod?
A: Properly relining a fishing rod is crucial for optimal fishing outcomes. It ensures smooth casting, prevents line twists, and enhances overall fishing performance.
Q: How can I select the right fishing line for my rod?
A: Selecting the appropriate fishing line involves considering factors like fishing type, target species, and water conditions. Choose a line with the right strength, diameter, and material for best results.
Q: What are some key tips for preparing a fishing rod for relining?
A: Before relining, inspect the rod for damages, clean the guides, and ensure the reel is functioning properly. Spool the line evenly, thread the guides meticulously, tie secure knots, and conduct final checks for a successful relining process.